
System Defense: Difference between revisions
No edit summary |
No edit summary |
||
| (62 intermediate revisions by 10 users not shown) | |||
| Line 1: | Line 1: | ||
''There's been an outbreak of vicious creatures near the confinement system in the West Kugu Desert. The Alliance Military is requesting help.'' | ''There's been an outbreak of vicious creatures near the confinement system in the West Kugu Desert. The Alliance Military is requesting help.'' | ||
{| class="wikitable" style="float:right;" | |||
! colspan="2" style="background:#FFA500;color:#000000" |System Defense | |||
|- | |||
{| class="wikitable" style=" | ! colspan="2" |[[File:Kugu_Desert.png|200px]] | ||
! | |- | ||
| Start Lobby | |||
! | | [[Moatoob|Dagora City]] | ||
|- | |- | ||
| Start Counter | |||
| Flyer Base | |||
|- | |- | ||
| | | End Lobby | ||
| | | W. Kugu: Field Base | ||
|- | |- | ||
| | | Version | ||
| | | Phantasy Star Universe | ||
|- | |- | ||
| | | Field | ||
| | | [[Kugu_Desert|Kugu Desert]] | ||
| | |||
|- | |- | ||
| | | Party Size | ||
| | | 1-6 Players | ||
|- | |- | ||
| | | Enemy Elements | ||
| | | [[File:Fire_Icon.gif]] [[File:Ground_Icon.gif]] [[File:Ice_Icon.gif]] [[File:Light_Icon.gif]] | ||
|} | |} | ||
== | ==Mission Requirements and Rewards== | ||
{| class="wikitable" style=" | {| class="wikitable" style="text-align:center" | ||
! rowspan=" | ! rowspan="2" style="background:#E0FFFF;color:#000000" | LV !! rowspan="2" style="background:#E0FFFF;color:#000000" | Req. LV !! rowspan="2" style="background:#E0FFFF;color:#000000" | Enemy LV !! colspan="2" style="background:#E0FFFF;color:#000000" | Rank S !! colspan="2" style="background:#E0FFFF;color:#000000" | Rank A !! colspan="2" style="background:#E0FFFF;color:#000000" | Rank B !! colspan="2" style="background:#E0FFFF;color:#000000" | Rank C | ||
! | |||
! rowspan=" | |||
! rowspan=" | |||
! | |||
! | |||
! | |||
! | |||
! colspan=" | |||
|- | |- | ||
| | ! style="background:#E0FFFF;color:#000000" | Meseta || style="background:#E0FFFF;color:#000000" | Points || style="background:#E0FFFF;color:#000000" | Meseta || style="background:#E0FFFF;color:#000000" | Points || style="background:#E0FFFF;color:#000000" | Meseta || style="background:#E0FFFF;color:#000000" | Points || style="background:#E0FFFF;color:#000000" | Meseta || style="background:#E0FFFF;color:#000000" | Points | ||
| | |- | ||
| | | C || 1 || 10+ || 1100 || 20 || 726 || 13 || 363 || 6 || 0 || 0 | ||
| | |- | ||
| | | B || 15 || 30+ || 2750 || 51 || 1815 || 33 || 907 || 16 || 0 || 0 | ||
| | |- | ||
| | | A || 40 || 70+ || 5000 || 105 || 3300 || 69 || 1650 || 34 || 0 || 0 | ||
| | |||
|- | |- | ||
| | | S || 70 || 100+ || 6500<br><small>1 [[PA Fragment]]<small> || 153 || 4290 || 100 || 2145 || 50 || 0 || 0 | ||
| | |||
| [[ | |||
| | |||
| | |||
| | |||
| | |||
| | |||
|- | |- | ||
| | | S2 || 100 || 150+ || ?<br><small>2 [[PA Fragments]]</small> || ? || ? || ? || ? || ? || 0 || 0 | ||
| | |||
| [[ | |||
| | |||
| | |||
| | |||
| | |||
| | |||
|- | |- | ||
| | | S3 || 130 || 175+ || 18000<br><small>3 [[PA Fragments]]</small> || ? || ? || ? || ? || ? || 0 || 0 | ||
| | |||
| [[ | |||
| | |||
| | |||
| | |||
| | |||
| | |||
|- | |- | ||
| | | S4 || 160 || 190+ || 27000<br><small>4 [[PA Fragments]]</small> || 329 || ? || ? || ? || ? || 0 || 0 | ||
| [[ | |||
| | |||
| | |||
| | |||
| | |||
| | |||
| | |||
|- | |- | ||
| [[ | |} | ||
==[[Bil De Vear]] Farming (S Rank)== | |||
*Currently, the [[Bil De Vear]] enemy only spawns in one variant of this mission, on Block 2, and only when specific enemies appear on Block 1. It is possible to abandon mission until the necessary Block and enemies appear. | |||
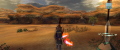
**For the correct Block 2 to appear, the start of the first Block needs to have a tree and a red gate far away and to the right (see picture below). If the mission starts with a tree and gate very close to the entrance, or a tree to the left side and a red door, Bil De Vear will not spawn. | |||
**Once the correct Block 1 is found, the first group of enemies to spawn needs to be 6 [[Naval]], followed immediately by 4 [[Vanda]]. Any other enemy spawns are the incorrect pattern, and Bil De Vear will not spawn. | |||
**Thank you to Araknagul for researching the necessary spawn patterns! | |||
<gallery> | |||
| | File:SystemDefenseBlock1.png|The necessary first Block | ||
File:SystemDefenseNaval.png|First spawn: 6 Naval | |||
File:SystemDefenseVanda.png|Second spawn: 4 Vanda | |||
| | </gallery> | ||
==Enemy Information== | |||
{| class="wikitable" style="width: 60%;text-align: center;" | |||
! style="background:#E0FFFF;color:#000000"| Enemy !! style="width: 4%;background:#E0FFFF;color:#000000"| Ele. !! style="background:#E0FFFF;color:#000000"| Special Drops !! style="background:#E0FFFF;color:#000000"| C Rank Drop !! style="background:#E0FFFF;color:#000000"| B Rank Drop !! style="background:#E0FFFF;color:#000000"| A Rank Drop !! style="background:#E0FFFF;color:#000000"| S Rank Drop !! style="background:#E0FFFF;color:#000000"| S2 Rank Drop !! style="background:#E0FFFF;color:#000000"| S3 Rank Drop !! style="background:#E0FFFF;color:#000000"| S4 Rank Drop | |||
|- | |||
| | |||
| | |||
| | |||
| | |||
| | |||
| | |||
|- | |- | ||
| [[ | | [[Bil De Vear]] || {{Ground}} || {{Bil De Vear | Level=Special}} || {{Bil De Vear | Level=10}} || {{Bil De Vear | Level=30}} || {{Bil De Vear | Level=70}} || {{Bil De Vear | Level=100}} || {{Bil De Vear | Level=150}} || {{Bil De Vear | Level=175}} || {{Bil De Vear | Level=190}} | ||
| | |||
| | |||
| | |||
| | |||
| | |||
| | |||
| | |||
|- | |- | ||
| [[ | | [[Bul Buna]] || {{Ground}} || {{Bul Buna | Level=Special}} || {{Bul Buna | Level=10}} || {{Bul Buna | Level=30}} || {{Bul Buna | Level=70}} || {{Bul Buna | Level=100}} || {{Bul Buna | Level=150}} || {{Bul Buna | Level=175}} || {{Bul Buna | Level=190}} | ||
| | |||
| | |||
| | |||
| | |||
| | |||
| | |||
| | |||
|- | |- | ||
| [[ | | [[Drua Gohra]] || {{Fire}} || - || {{Drua Gohra | Level=10}} || {{Drua Gohra | Level=30}} || {{Drua Gohra | Level=70}} || {{Drua Gohra | Level=100}} || {{Drua Gohra | Level=150}} || {{Drua Gohra | Level=175}} || {{Drua Gohra | Level=190}} | ||
| | |||
| | |||
| | |||
| | |||
| | |||
| | |||
| | |||
|- | |- | ||
| [[ | | [[Jishagara]] || {{Ice}} || - || {{Jishagara | Level=10}} || {{Jishagara | Level=30}} || {{Jishagara | Level=70}} || {{Jishagara | Level=100}} || {{Jishagara | Level=150}} || {{Jishagara | Level=175}} || {{Jishagara | Level=190}} | ||
| | |||
| | |||
| | |||
| | |||
| | |||
| | |||
| | |||
|- | |- | ||
| [[ | | [[Naval]] || {{Ground}} || - || {{Naval | Level=10}} || {{Naval | Level=30}} || {{Naval | Level=70}} || {{Naval | Level=100}} || {{Naval | Level=150}} || {{Naval | Level=175}} || {{Naval | Level=190}} | ||
| | |||
| | |||
| - | |||
| | |||
| | |||
| | |||
| | |||
|- | |- | ||
| [[Vanda | | [[Vanda]] || {{Fire}} || {{Vanda | Level=Special}} || {{Vanda | Level=10}} || {{Vanda | Level=30}} || x || x || x || x || x | ||
| | |||
| | |||
| | |||
| | |||
| | |||
| | |||
| | |||
|- | |- | ||
| [[Vanda Merha|Vanda Merha | | [[Vanda Merha]] || {{Fire}} || {{Vanda Merha | Level=Special}} || x || x || {{Vanda Merha | Level=70}} || {{Vanda Merha | Level=100}} || {{Vanda Merha | Level=150}} || {{Vanda Merha | Level=175}} || {{Vanda Merha | Level=190}} | ||
| | |||
| | |||
| | |||
| | |||
| | |||
| | |||
| | |||
|- | |- | ||
! colspan="10" style="background:#E0FFFF;color:#000000" | Rare Enemy | |||
|- | |- | ||
| [[Jaggo]] || {{Light}} || {{Jaggo | Level=Special}} || {{Jaggo | Level=10}} || {{Jaggo | Level=30}} || {{Jaggo | Level=70}} || {{Jaggo | Level=100}} || {{Jaggo | Level=150}} || {{Jaggo | Level=175}} || {{Jaggo | Level=190}} | |||
|} | |} | ||
==Area Drops== | ==Area/Box Drops== | ||
{| class="wikitable" style="width: 60%;text-align: center;" | {| class="wikitable" style="width: 60%;text-align: center;" | ||
! | ! style="background:#E0FFFF;color:#000000"| Enemy !! style="background:#E0FFFF;color:#000000"| Special Drops !! style="background:#E0FFFF;color:#000000"| C Rank !! style="background:#E0FFFF;color:#000000"| B Rank !! style="background:#E0FFFF;color:#000000"| A Rank !! style="background:#E0FFFF;color:#000000"| S Rank !! style="background:#E0FFFF;color:#000000"| S2 Rank !! style="background:#E0FFFF;color:#000000"| S3 Rank !! style="background:#E0FFFF;color:#000000"| S4 Rank | ||
! | |||
! | |||
! | |||
! | |||
! | |||
! | |||
! | |||
! | |||
|- | |- | ||
| | | [[Box Drops|Normal Box]] | ||
| - | | <!-- Special --> ? | ||
| | | <!-- C --> {{BoxHard | Level=MC}} | ||
| | | <!-- B --> {{BoxHard | Level=MB}} | ||
| | | <!-- A --> {{BoxHard | Level=MA}} | ||
| | | <!-- S --> {{BoxHard | Level=MS}} | ||
| | | <!-- S2 --> {{BoxHard | Level=MS2}} | ||
| | | <!-- S3 --> {{BoxHard | Level=MS3}} | ||
| | | <!-- S3 --> {{BoxHard | Level=MS3}} | ||
|- | |- | ||
| | | [[Box Drops|Reward Box]] | ||
| <!-- Special --> x | |||
| <!-- C --> x | |||
! | | <!-- B --> x | ||
! | | <!-- A --> x | ||
! | | <!-- S --> x | ||
! | | <!-- S2 --> x | ||
! | | <!-- S3 --> 2x [[Gold W. Badge]]<br>1x [[Synthesis_Ingredients#Pyroxenes|Pyroxene]] or [[Chronoseline]]<br>1x [[Synthesis_Ingredients#Metals|13★ Metal]] | ||
! | | <!-- S4 --> 2x [[Gold W. Badge]]<br>1x [[Synthesis_Ingredients#Pyroxenes|Pyroxene]] or [[Chronoseline]]<br>1x [[Synthesis_Ingredients#Metals|13★ Metal]] | ||
! | |- | ||
! | | [[Box Drops|Clear Box]] | ||
! | | <!-- Special --> x | ||
| <!-- C --> x | |||
| <!-- B --> x | |||
| <!-- A --> x | |||
| <!-- S --> x | |||
| <!-- S2 --> x | |||
| <!-- S3 --> [[Amun Tomb]]<br>[[Amun-Ra]]<br>[[S-Gold Blades]]<br>[[Leonia]]<br>[[Jigo Booma Claws]]<br>[[Meteos Arrow]]<br>[[Orpa / Rainbow]]<br>[[Lambdacalibre]]<br>[[Excalibre]]<br>[[Death Stinger]]<br>[[Heaven Avenger]]<br>[[Twilight Rune]] | |||
| <!-- S4 --> [[Ra Bangle/U]]<br>[[Twin Kitty Claw/U]]*<br>[[Heaven Striker/U]]<br>[[To The Skies]]<br>[[Nanoblast Scythes]]<br>[[Ill Gill Testament]]<br>[[Master Swordsman]]<br>[[Gal Wind Burst]]<br>[[Emperor Axeon Cross]]<br>[[Bloodspear Vlad Bram]]<br>[[God Hands]]<br>[[Photon Rectenno]] | |||
|- | |- | ||
|- | |- | ||
| [[Area Drops]] || {{Kugu Desert | Level=Special}} || {{Kugu Desert | Level=10}} || {{Kugu Desert | Level=30}} || {{Kugu Desert | Level=70}} || {{Kugu Desert | Level=100}} || {{Kugu Desert | Level=150}} || {{Kugu Desert | Level=175}} || {{Kugu Desert | Level=190}} | |||
|} | |} | ||
{{Drop | |||
|source=System Defense S4 | |||
|item id=01185603 | |||
|table label=Clear Box | |||
|tickets=2 | |||
}} | |||
Latest revision as of 19:11, 20 May 2024
There's been an outbreak of vicious creatures near the confinement system in the West Kugu Desert. The Alliance Military is requesting help.
| System Defense | |
|---|---|

| |
| Start Lobby | Dagora City |
| Start Counter | Flyer Base |
| End Lobby | W. Kugu: Field Base |
| Version | Phantasy Star Universe |
| Field | Kugu Desert |
| Party Size | 1-6 Players |
| Enemy Elements | |
Mission Requirements and Rewards
| LV | Req. LV | Enemy LV | Rank S | Rank A | Rank B | Rank C | ||||
|---|---|---|---|---|---|---|---|---|---|---|
| Meseta | Points | Meseta | Points | Meseta | Points | Meseta | Points | |||
| C | 1 | 10+ | 1100 | 20 | 726 | 13 | 363 | 6 | 0 | 0 |
| B | 15 | 30+ | 2750 | 51 | 1815 | 33 | 907 | 16 | 0 | 0 |
| A | 40 | 70+ | 5000 | 105 | 3300 | 69 | 1650 | 34 | 0 | 0 |
| S | 70 | 100+ | 6500 1 PA Fragment |
153 | 4290 | 100 | 2145 | 50 | 0 | 0 |
| S2 | 100 | 150+ | ? 2 PA Fragments |
? | ? | ? | ? | ? | 0 | 0 |
| S3 | 130 | 175+ | 18000 3 PA Fragments |
? | ? | ? | ? | ? | 0 | 0 |
| S4 | 160 | 190+ | 27000 4 PA Fragments |
329 | ? | ? | ? | ? | 0 | 0 |
Bil De Vear Farming (S Rank)
- Currently, the Bil De Vear enemy only spawns in one variant of this mission, on Block 2, and only when specific enemies appear on Block 1. It is possible to abandon mission until the necessary Block and enemies appear.
- For the correct Block 2 to appear, the start of the first Block needs to have a tree and a red gate far away and to the right (see picture below). If the mission starts with a tree and gate very close to the entrance, or a tree to the left side and a red door, Bil De Vear will not spawn.
- Once the correct Block 1 is found, the first group of enemies to spawn needs to be 6 Naval, followed immediately by 4 Vanda. Any other enemy spawns are the incorrect pattern, and Bil De Vear will not spawn.
- Thank you to Araknagul for researching the necessary spawn patterns!
-
The necessary first Block
-

First spawn: 6 Naval
-

Second spawn: 4 Vanda


Enemy Information
| Enemy | Ele. | Special Drops | C Rank Drop | B Rank Drop | A Rank Drop | S Rank Drop | S2 Rank Drop | S3 Rank Drop | S4 Rank Drop |
|---|---|---|---|---|---|---|---|---|---|
| Bil De Vear | Bil De Vear Horn | [B] Soda Gigassa | [B] Soda Clayma | [B] Ank Barde | [B] Bil De Axe | Bil De Vear Cane | Bil De Horn Axe | Warrior's Wisdom | |
| Bul Buna | Bul Buna Lung | Arb Pam | Arb Roga | Arb Magana | [B] Deathmaker | [B] Shigga Baret | Kenkon-ken | Strange Material | |
| Drua Gohra | - | W'gasta | W'gasep | Gur Napam | [B] Gur Bazga | [B] Rabol Voria | Kaiser Viera | Emperor Axeon Cross | |
| Jishagara | - | [B] Gudda Fest | [B] Gudda Waya | [B] Gudda Godda | [B] Gudda Skela | Karakasa J. Gun | Flamberge | Demolition Comet | |
| Naval | - | [B] Rabol Ridla | [B] Rabol Welda | [B] Rabol Rad | [B] Rabol Lebfa | [B] Rabol Gerard | Death's Nirvana | Ra Bangle | |
| Vanda | Vanda Derma | Shigga Spud | Shigga Bigul | x | x | x | x | x | |
| Vanda Merha | Vanda Derma | x | x | Shigga Brada | [B] Shigga Desta | Toop Yupke | Dios Despertar | Kuraokami | |
| Rare Enemy | |||||||||
| Jaggo | Jaggo Delma Meow Mustache |
Perpa / Hit | Tero / Hit | Giga / Bullet PP Save | Giga / Bullet PP Save | Vijerina / Hit | Gerard / Bullet | Chigaheshi | |
Area/Box Drops
[[|{{{name}}}]]
1/50,000