Il Cabo Base: Difference between revisions
No edit summary |
No edit summary |
||
| (8 intermediate revisions by 2 users not shown) | |||
| Line 1: | Line 1: | ||
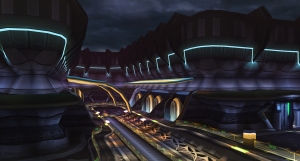
[[File:Cabo_Base.png|300px|thumb|right|Il Cabo Base hidden | [[File:Cabo_Base.png|300px|thumb|right|Il Cabo Base hidden far north on Moatoob.]] | ||
Il Cabo Base was once the AMF's foremost research facility. Its original use was for experimenting on captured native animals, but due to the influence of the SEED, the base has been overrun with violent creatures. | Il Cabo Base was once the AMF's foremost research facility. Its original use was for experimenting on captured native animals, but due to the influence of the SEED, the base has been overrun with violent creatures. | ||
| Line 7: | Line 7: | ||
*[[Bladed Legacy|Bladed Legacy]] | *[[Bladed Legacy|Bladed Legacy]] | ||
*[[Lonely Laboratory|Lonely Laboratory]] | *[[Lonely Laboratory|Lonely Laboratory]] | ||
</br> | |||
==Area Drops== | |||
{| class="wikitable" style="width: 80%;text-align: center;" | |||
! rowspan="1" style="background:#E0FFFF;color:#000000;width: 8%" | | |||
! rowspan="1" style="background:#E0FFFF;color:#000000;width: 15%" |Special Drops | |||
! rowspan="1" style="background:#E0FFFF;color:#000000;width: 10%" |LV 1-9 | |||
! rowspan="1" style="background:#E0FFFF;color:#000000;width: 10%" |LV 10-19 | |||
! rowspan="1" style="background:#E0FFFF;color:#000000;width: 10%" |LV 20-29 | |||
! rowspan="1" style="background:#E0FFFF;color:#000000;width: 10%" |LV 30-39 | |||
! rowspan="1" style="background:#E0FFFF;color:#000000;width: 10%" |LV 40-49 | |||
! rowspan="1" style="background:#E0FFFF;color:#000000;width: 10%" |LV 50-59 | |||
! rowspan="1" style="background:#E0FFFF;color:#000000;width: 10%" |LV 60-69 | |||
|- | |||
| Items | |||
! rowspan="2" | {{Labs | Level=Special}} | |||
| {{Labs | Level=1}} | |||
| {{Labs | Level=10}} | |||
| {{Labs | Level=20}} | |||
| {{Labs | Level=30}} | |||
| {{Labs | Level=40}} | |||
| {{Labs | Level=50}} | |||
| {{Labs | Level=60}} | |||
|} | |||
{| class="wikitable" style="width: 80%;text-align: center;" | |||
== | ! rowspan="1" style="background:#E0FFFF;color:#000000;width: 8%" | | ||
! rowspan="1" style="background:#E0FFFF;color:#000000;width: 15%" |Special Drops | |||
! rowspan="1" style="background:#E0FFFF;color:#000000;width: 10%" |LV 70-79 | |||
! rowspan="1" style="background:#E0FFFF;color:#000000;width: 10%" |LV 80-99 | |||
! rowspan="1" style="background:#E0FFFF;color:#000000;width: 10%" |LV 100-124 | |||
! rowspan="1" style="background:#E0FFFF;color:#000000;width: 10%" |LV 125-149 | |||
! rowspan="1" style="background:#E0FFFF;color:#000000;width: 10%" |LV 150-174 | |||
! rowspan="1" style="background:#E0FFFF;color:#000000;width: 10%" |LV 175-189 | |||
! rowspan="1" style="background:#E0FFFF;color:#000000;width: 10%" |LV 190-200 | |||
|- | |||
| Items | |||
! rowspan="2" | {{Labs | Level=Special}} | |||
| {{Labs | Level=70}} | |||
| {{Labs | Level=80}} | |||
| {{Labs | Level=100}} | |||
| {{Labs | Level=125}} | |||
| {{Labs | Level=150}} | |||
| {{Labs | Level=175}} | |||
| {{Labs | Level=190}} | |||
|} | |||
Latest revision as of 13:04, 17 November 2022

Il Cabo Base was once the AMF's foremost research facility. Its original use was for experimenting on captured native animals, but due to the influence of the SEED, the base has been overrun with violent creatures.
Available Missions
The following missions use Il Cabo Base for Area Drops
Area Drops
| Special Drops | LV 1-9 | LV 10-19 | LV 20-29 | LV 30-39 | LV 40-49 | LV 50-59 | LV 60-69 | |
|---|---|---|---|---|---|---|---|---|
| Items | Lab Set Di-, Megi- Photons |
1-5★ Ores [B] Swordoc [B] Sodadoc |
1-6★ Ores [B] Swordoc [B] Sodadoc |
1-7★ Ores [B] Swordoc [B] Sodadoc |
1-8★ Ores [B] Swordoc [B] Sodadoc |
1-9★ Ores 7-9★ Gemstones [B] Swordoc [B] Sodadoc |
1-10★ Ores 7-10★ Gemstones [B] Hanzoc [B] Soda Hazzoc |
2-11★ Ores 7-11★ Gemstones [B] Hanzoc [B] Soda Hazzoc |
